
A soffit is the finished underside of a roof’s eave — the horizontal surface you see when you stand at the edge of your house and look up. It sits between the exterior wall and the fascia board, closing off the gap where your roof overhangs the siding. More importantly, it’s the intake side of your attic’s ventilation system, and when it fails or gets blocked, the consequences show up in your shingles, your attic framing, and eventually your energy bills.
Act now if you notice sagging panels, peeling paint near the eaves, water stains on the soffit surface, or signs of mold or condensation in the attic. Those symptoms rarely fix themselves.
Key Takeaways
Soffits are the intake side of your attic’s ventilation system, and keeping them open and intact is one of the highest-leverage maintenance tasks a homeowner can do for long-term roof performance.
| Point | Details |
|---|---|
| What a soffit is | The finished horizontal underside of a roof eave, sitting between the exterior wall and the fascia board. |
| Continuous intake matters | Perforated or slotted panels across the full eave outperform spot vents, which leave rafter bays stagnant and prone to rot. |
| Never block vents with insulation | Install rafter baffles before insulating to the eaves; blocked soffit vents are the most common attic insulation mistake per ENERGY STAR. |
| Signs of failure | Sagging panels, water stains near eaves, attic mold, and no visible daylight through vents all warrant prompt inspection. |
| Coastal Roofing & Construction | Licensed, insured, and manufacturer-certified contractor serving Tampa Bay; offers soffit, fascia, and full roofing system inspections. |
Table of Contents
- What is soffit roofing, and where does it sit on your house?
- How do soffit and fascia differ from each other?
- What does soffit do for your roof and home?
- What types of soffit materials are available?
- How does soffit ventilation actually work with your attic?
- Signs your soffit or attic ventilation needs attention
- How to inspect and maintain your soffits safely
- When should you replace soffits, and what does it cost?
- DIY vs. hiring a pro: where’s the line?
- Expert tips from Coastal Roofing & Construction
- What proper soffit care means in practice
- Ready to get a professional assessment?
- Sources
What is soffit roofing, and where does it sit on your house?
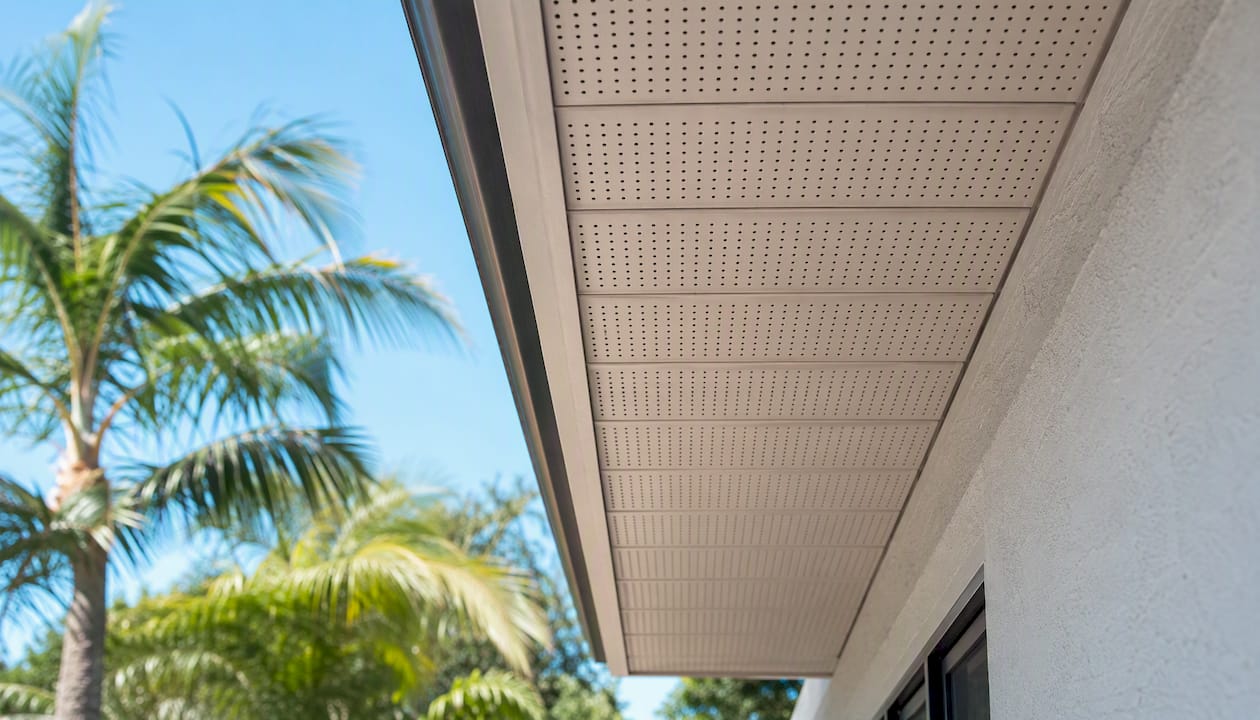
Wikipedia defines a soffit as the exposed underside of a roof eave, and the exposure width can range from a few inches on a modest overhang to several feet on a deep, covered porch-style eave. On most American homes, it’s that continuous horizontal strip running along the underside of the roofline, connecting the exterior wall to the fascia.
From the ground, here’s what to look for:
- A flat or slightly angled panel running horizontally beneath the eave
- Perforated sections or narrow slot openings (those are the vents)
- A continuous strip vent or individual round/rectangular spot vents spaced along the panel
- A clean, painted surface on newer homes; exposed rafter tails on older homes that were never enclosed
From the attic, you can see the back side of the soffit panels and, if vented, the daylight or mesh screen where outside air enters. HowStuffWorks notes that older homes sometimes have open rafters with no soffit at all — the eave underside is just exposed framing. If that’s your house, you’re missing both the protective finish and the ventilation function.
Pro Tip: Take a flashlight into the attic on a bright day and look toward the eaves. You should see light coming through the soffit vents. If you don’t, those vents are blocked — and your attic is paying for it.
How do soffit and fascia differ from each other?
These two components sit right next to each other, so the confusion is understandable. They do completely different jobs.
| Component | Location | Primary function | Gutter connection |
|---|---|---|---|
| Soffit | Horizontal underside of the eave | Covers eave, houses intake vents | No direct connection |
| Fascia | Vertical board at the roof edge | Caps rafter ends, supports gutters | Gutters mount here |
The fascia is the vertical trim board you see at the very edge of the roofline. Your gutters bolt directly to it. When a fascia board rots, the gutter can pull away from the house — a problem that’s visible and urgent. Soffit damage is quieter. A cracked or blocked soffit panel doesn’t affect gutter alignment, but it does compromise attic airflow, which is the slower, more expensive failure mode.
Think of them as a team: the fascia holds the edge together structurally, and the soffit closes off the underside and breathes. Both need to be intact for the eave to do its job.
What does soffit do for your roof and home?
The soffit does four things, and ventilation is the one most homeowners underestimate.
- Finished appearance: Closes off the eave underside so you don’t see exposed rafter tails, wiring, or insulation from the ground.
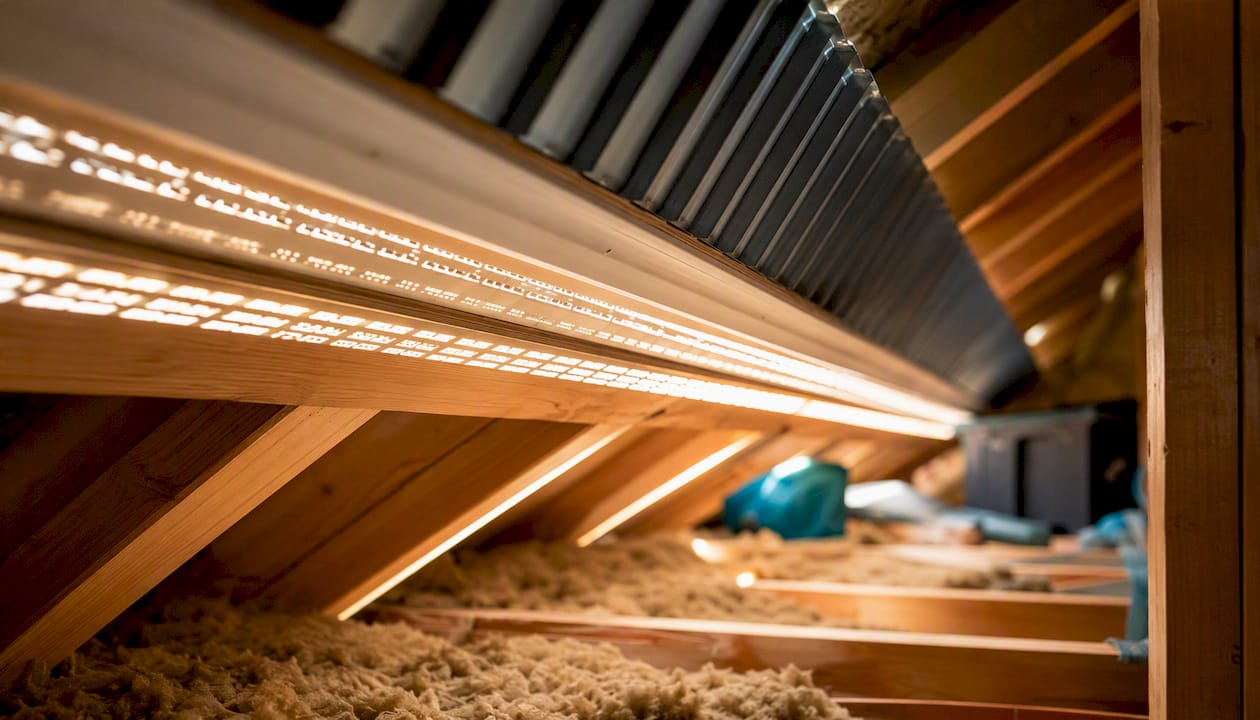
- Intake ventilation: Pulls cool outside air into the attic, which then rises and exits through ridge or gable vents. This is the engine of passive attic ventilation.
- Moisture control: Keeps humid outdoor air from condensing on cold roof sheathing by maintaining airflow. Without it, attic moisture builds up and rots the deck from the inside.
- Pest and bird exclusion: A properly screened soffit vent keeps wasps, birds, squirrels, and bats out of the eave cavity.
The Roofing Brief explains that properly functioning soffit ventilation paired with ridge vents extends roof performance and that blocked soffit vents are a common cause of premature shingle failure. That’s not a minor maintenance issue — it’s a warranty concern.
The most common homeowner mistake is relying on intermittent “spot” vents spaced every few feet. InspectApedia notes that these spot vents are usually ineffective because they leave entire rafter bays unvented. The rafter bays between vents stay stagnant, and that’s where localized rot and mold develop first.
Pro Tip: Never push attic insulation all the way to the eaves without installing rafter baffles first. ENERGY STAR warns that blocking soffit vents with insulation is the most common attic insulation mistake — and it turns your intake vents into dead ends.
What types of soffit materials are available?
Soffits come in two functional categories — vented and solid — and four common materials. The right choice depends on your climate, budget, and how much maintenance you’re willing to do.
Vented vs. solid: Vented soffits have perforations or built-in slots that allow airflow. Solid soffits are used where ventilation comes from another source (gable vents, for example) or on enclosed eaves where no intake is needed. For most pitched-roof homes, vented soffit is the correct choice.
| Material | Durability | Maintenance | Paintable | Notes |
|---|---|---|---|---|
| Vinyl | Moderate | Very low | Limited | Can warp in extreme heat; affordable and widely available |
| Aluminum | High | Low | Yes | Resists rot and insects; dents but doesn’t warp |
| Wood | Moderate | High | Yes | Attractive grain; requires regular painting and sealing |
| Fiber cement | High | Low | Yes | Resists rot, fire, and insects; heavier and costlier to install |
Vinyl is the most common choice on new construction because it’s inexpensive and requires almost no upkeep. In hot climates like Florida, though, it can warp or pull away from the channel over time. Aluminum holds up better in coastal environments where salt air accelerates corrosion on other materials. Wood looks the best but demands the most from you — skip a paint cycle and you’re looking at rot within a few seasons. Fiber cement sits between wood and aluminum: it takes paint beautifully, resists pests, and lasts for decades, but the material and labor cost more upfront.
Insect screens are available for all four materials and should be standard on any vented soffit. Without them, the vent opening is an open invitation for wasps and birds.
How does soffit ventilation actually work with your attic?
The airflow path is simple: cool air enters through the soffit vents at the eave, rises through the rafter bays as it warms, and exits through ridge vents at the peak or gable vents at the ends of the attic. This convection-driven loop runs passively — no fan required — as long as the intake and exhaust are both open and balanced.
Three elements must be present and unobstructed for this to work:
- Continuous soffit intake: Airflow between every rafter bay, not just a few spots. Continuous strip vents or perforated panels that run the full length of the eave are the modern standard.
- Rafter baffles: Cardboard or foam channels installed between each rafter pair that hold an air gap open even when insulation is blown in around them. Without baffles, insulation migrates into the soffit cavity and seals off the intake.
- Upper exhaust: Ridge vents, gable vents, or a combination that allows warm, moist air to escape at or near the roof peak.
ENERGY STAR’s attic ventilation guidance is specific: install rafter vents before adding insulation near the eaves, and use blocking to prevent blown insulation from migrating into the soffit cavity. If exhaust vents exist but intake is blocked, the system can actually pull conditioned air from your living space into the attic — raising cooling costs rather than lowering them.
For attic insulation and roofing ventilation to work together, the intake side has to be open. That’s the soffit’s job, and it has to do it across the entire eave, not just in a few spots.
Signs your soffit or attic ventilation needs attention
A quick visual check from the ground and a few minutes in the attic can catch most problems before they become expensive.
Exterior signs to look for:
- Soffit panels sagging, cracked, or pulling away from the channel
- Peeling paint or water stains on the soffit surface near the eaves
- Visible rot, soft spots, or discoloration on wood soffits
- Pest activity — wasp nests, bird nests, or chewed edges near vent openings
- Missing or damaged vent screens
Attic signs:
- Wet or dark-stained roof sheathing, especially in localized patches near the eaves
- Mold or mildew smell, or visible growth on the underside of the roof deck
- Ice dams forming at the eave edge in winter (a sign of heat escaping through an under-ventilated attic)
- Insulation pushed all the way to the eave with no visible daylight through the soffit vents
- Unusually high attic temperatures in summer
Prioritize active water entry and structural rot above everything else. Mold and localized rot need attention within weeks, not months — left alone, they spread into the rafter framing and the repair cost multiplies.
How to inspect and maintain your soffits safely
Most homeowners can handle a basic inspection and minor repairs with common tools. The key is knowing where the line is between a DIY task and a contractor call.
- Ground-level inspection: Walk the perimeter of your house and look up at the soffit from below. Use binoculars if the eaves are high. Note any sagging, staining, or missing vent screens.
- Ladder inspection: Set a stable ladder on level ground and inspect individual panels up close. Press gently on the surface — soft spots indicate rot underneath. Photograph everything you find.
- Attic inspection: On a bright day, enter the attic and look toward the eaves with a flashlight. Check for daylight through vents, signs of moisture on the sheathing, and whether insulation is blocking the intake path.
- Clear debris from vents: Use a soft brush or compressed air to remove dirt, insulation fibers, and nesting material from vent openings. This is a safe, straightforward DIY task.
- Replace a small vented panel: Remove the damaged panel by unscrewing or unclipping it from the channel, cut a replacement to size, and snap or screw it in. Match the material and vent pattern of the existing soffit.
- Reattach loose panels: If a panel has pulled away from the J-channel, press it back into the channel and secure with appropriate screws or nails. Caulk any gaps where water could enter.
- Install insect screens: Cut mesh screen to size and staple or clip it behind the vent opening from inside the attic. This is a 15-minute task per vent.
- Install rafter baffles: Staple foam or cardboard baffles between each rafter pair, running from the soffit vent up toward the ridge. Do this before adding or redistributing attic insulation.
Safety callouts: Never work on a ladder in wet conditions or on a windy day. If the soffit framing underneath feels soft or crumbles when you press on it, stop — that’s structural rot and it needs a contractor. Heavy pest infestations (active wasp nests, large rodent colonies) should be treated by a pest control professional before you open any panels.
For roof care maintenance priorities, annual soffit inspection fits naturally into a spring or fall exterior walkthrough.
When should you replace soffits, and what does it cost?
Material lifespan varies considerably. Vinyl soffits typically last a couple of decades under normal conditions, though heat and UV exposure can shorten their lifespan in southern climates. Aluminum soffits can last several decades with minimal maintenance. Wood soffits, when properly painted and sealed, can last a couple of decades — but neglecting maintenance can lead to rot much sooner. Fiber cement soffits are very durable and can last many decades.
Broad U.S. cost ranges for soffit work:
- Minor repairs (replacing one or two panels, reattaching loose sections): roughly $150–$400 depending on access and material.
- Partial replacement (one or two elevations of the house): typically $500–$1,500.
- Full soffit replacement (all four sides, standard single-story home): commonly $1,500–$4,000 or more, depending on linear footage, material choice, and whether rotten framing needs to be replaced.
Concealed rot is the biggest cost wildcard. A soffit that looks merely stained from the ground can hide rotted rafter tails and fascia boards underneath. Once the panels come off, the scope expands. Always ask for a written estimate that accounts for the possibility of hidden rot, and get clarity on how additional work will be priced before the job starts.
Blocked or undersized soffit vents are a leading cause of premature shingle failure in warranty claims — which means the cost of ignoring a ventilation problem often shows up in a roof replacement bill, not just a soffit repair.
DIY vs. hiring a pro: where’s the line?
Some soffit tasks are genuinely manageable for a handy homeowner. Others carry real safety and structural risk.
Reasonable DIY tasks:
- Annual visual inspection from the ground and attic
- Clearing debris and insulation from vent openings
- Replacing one or two small vented panels on a single-story home
- Installing insect screens behind existing vents
- Installing rafter baffles in an accessible attic
Call a licensed contractor when:
- The soffit framing (rafter tails, lookouts) is rotted or structurally compromised
- Rot extends into the fascia or wall sheathing
- You’re upgrading the entire ventilation system (adding continuous intake, replacing spot vents with strip vents)
- The work requires climbing above a single-story roofline
- You’re combining soffit replacement with a roof replacement or re-roofing project
Questions to ask any contractor before signing:
- Are you licensed and insured in this state?
- Do you carry manufacturer certifications (Owens Corning, GAF, or similar)?
- Will you provide a written scope that specifies the ventilation approach, not just “replace soffits”?
- What’s your process if you find hidden rot once the panels come off?
- Does the estimate include a warranty on labor?
Red flags in a quote: vague scope (“repair as needed”), no written ventilation plan, no mention of baffles or intake continuity, missing insurance certificate, or a price that seems unusually low with no explanation of what’s excluded.
For homeowners preparing for larger work, this Tampa Bay roof replacement preparation guide walks through what to expect before a contractor arrives.
Expert tips from Coastal Roofing & Construction
The following reflects company-provided E-E-A-T content from Ryan at Coastal Roofing & Construction, a licensed and insured roofing contractor serving the Tampa Bay area, manufacturer-certified with Owens Corning, GAF, and Tri County Metals.
Two contractor tips that come up on almost every soffit job:
Prefer continuous soffit intake over spot vents. When we replace soffits, we default to perforated or slotted panels that run the full length of the eave. Spot vents leave rafter bays unvented, and those bays are exactly where we find localized sheathing rot when we pull the panels off years later.
Always inspect the attic sheathing when replacing soffits. The soffit is the last thing to fail visibly. By the time a panel is sagging or stained, the sheathing directly above it has often been wet for months. Opening the soffit is the right moment to check the deck condition before you close everything back up.
A recent example: a homeowner in the Tampa Bay area called about a sagging soffit panel on the rear elevation of their home. From the ground it looked like a simple panel replacement. When we removed the panels, we found three rafter tails with significant rot and a section of roof sheathing that had been wet long enough to develop mold. The root cause was a combination of blocked spot vents and insulation that had been pushed all the way to the eave during a prior attic insulation job. The repair required replacing the rafter tails, treating the sheathing, installing continuous vented soffit panels, and adding baffles before re-insulating. The homeowner had no idea the attic was in that condition — the exterior looked almost normal.
What proper soffit care means in practice
Florida’s Gulf Coast climate makes soffit ventilation more consequential than in most of the country. High humidity, intense summer heat, and hurricane-season wind-driven rain put every component of the eave system under stress year-round. A soffit that’s adequate in a dry northern climate may be undersized or poorly sealed for a coastal home in Pinellas or Hillsborough County.
Coastal Roofing & Construction approaches every soffit and fascia job with the same standard we apply to full roof replacements: licensed, insured, manufacturer-certified, and committed to written scopes that don’t leave ventilation as an afterthought. If the intake isn’t right, the roof above it won’t perform the way it should — and that’s a promise we’re not willing to make to a homeowner.
Ready to get a professional assessment?
This page is published by Coastal Roofing & Construction, a licensed and insured roofing contractor serving the Tampa Bay area, including Pinellas, Hillsborough, and Pasco Counties.

If you’ve spotted any of the warning signs covered here — sagging panels, water stains, attic moisture, or blocked vents — the next step is a professional inspection. Coastal Roofing & Construction offers roof and soffit inspections for homeowners throughout the Tampa Bay area. Before you call, it helps to have a few photos of the affected areas, a rough description of what you’re seeing (inside and outside), and the approximate age of your roof. That information lets us give you a more accurate assessment from the start.
To get started, visit our homeowner FAQ and contact page or explore our shingle roofing and ventilation services to see how proper soffit and attic ventilation integrates with a full roof system.
Sources
These are the primary references used throughout this article:
- About Attic Ventilation | ENERGY STAR
- Soffit intake vents: how to Install Soffit Intake Vents to Stop Attic Condensation, Ice Dam Leaks, Attic Mold, & Roof Structure Damage
- Soffit Vents: How They Save Your Roof | The Roofing Brief
- Soffit
- What is a Soffit: Understanding Its Key Role in Proper Home Design | HowStuffWorks