
Roof valley flashing is the metal or membrane liner installed in the V-shaped junction where two roof slopes meet, built specifically to channel the concentrated water flow that collects there away from the deck and into the gutters. Without it, that junction becomes the most likely place on your roof to develop a leak.
Every weatherproof valley assembly relies on three components working together:
- A self-adhering waterproof underlayment (such as Grace Ice & Water Shield, GAF WeatherWatch, or Tamko MoistureWrap) centered on the valley
- A metal or membrane liner laid over the underlayment
- Correct shingle setbacks and nailing practice that keep fasteners out of the active flow zone
The valley is where two roof planes drain into one line. That single line carries twice the water of either slope alone, which is why it needs its own dedicated waterproofing layer, not just shingles.
Pro Tip: If you can see your roof from a second-floor window or from the street, look for the diagonal lines where two roof sections meet. Those are your valleys. Any rust streaks, missing granules, or lifted shingles along those lines deserve a closer look.
Key Takeaways
Roof valley flashing is the single most important waterproofing detail on any roof with intersecting slopes, and getting the underlayment spec and metal gauge right matters far more than which shingle brand goes on top.
| Point | Details |
|---|---|
| Valley flashing purpose | Channels doubled water flow at intersecting slopes away from the deck to prevent leaks. |
| Three main methods | Open (exposed metal), closed-cut (hidden under shingles), and woven (incompatible with architectural shingles). |
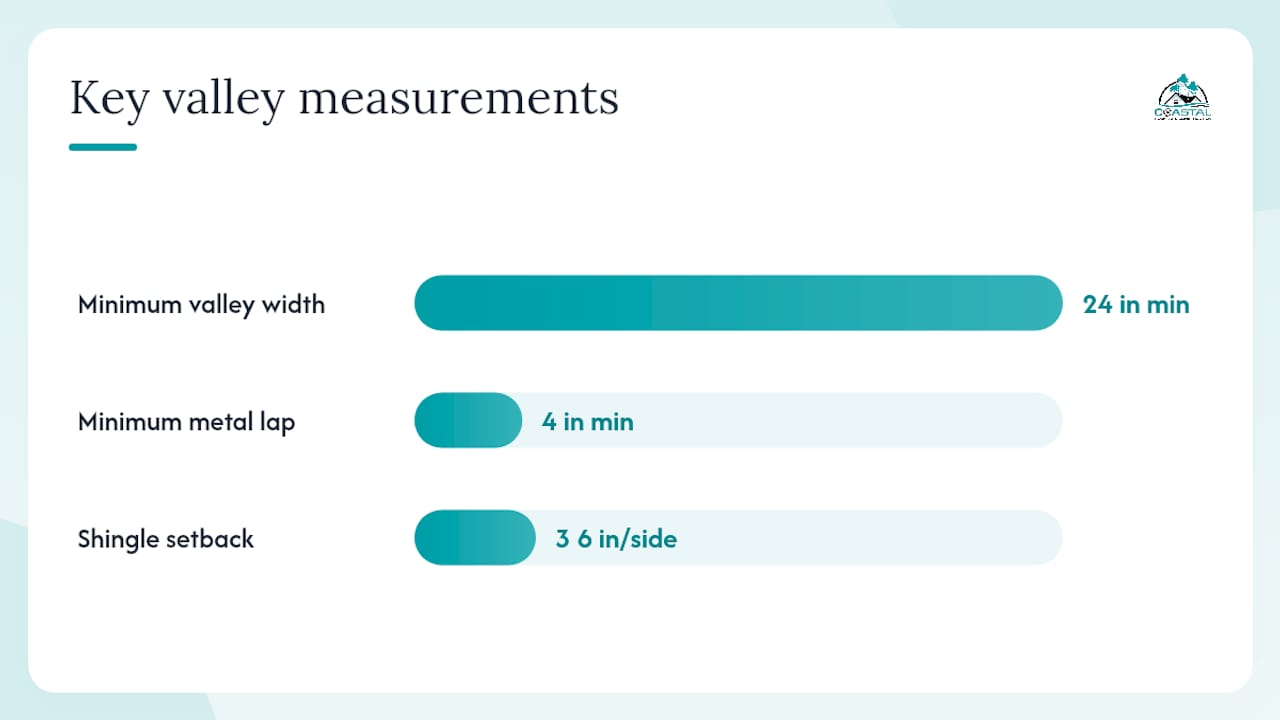
| Code minimum | IRC 2024 R905.2.8 requires minimum 24-inch-wide metal or self-adhering membrane; no nails in the flow zone. |
| Inspect after storms | Look for rust streaks, lifted shingle edges, and interior attic staining below valley lines. |
| When to replace | Widespread corrosion, repeated leaks after patching, or any full reroof — replace flashing at the same time. |
Table of Contents
- What is roof valley flashing and why does it matter?
- The three main valley types and how flashing works with each
- What materials are used for valley flashing?
- How valley flashing is installed: a homeowner-level overview
- Does your roof need valley flashing, and what does code require?
- How to spot valley flashing problems before they become leaks
- Maintenance, repairs, and when to call for a replacement
- What a professional roofer checks and what it costs
- Ready to have your valley flashing inspected?
- The part of valley flashing most homeowners get wrong
- Sources
What is roof valley flashing and why does it matter?
A roof valley is the internal angle formed where two downward-sloping roof planes intersect. Picture the crease at the bottom of an open book held spine-up: that crease is the valley. Rain falling on both sides of the book runs toward that crease and exits at the bottom.
On a real roof, valley flashing directs that concentrated runoff where two slopes meet, and it is one of the most common locations for leaks when the liner is missing, corroded, or improperly installed. The physics are straightforward: two planes funnel water into a single discharge path, so the volume and velocity at the valley centerline are higher than anywhere else on the roof surface.
Good flashing design coordinates with drainage planes to shed water downward and outward, keeping it moving away from the deck and the structure below. When that principle breaks down at a valley, water backs up under shingles, saturates the deck, and eventually finds its way into the attic or wall cavity.
Valleys are also the first place to check after a Florida storm. Wind-driven rain hits them at an angle, debris accumulates there, and ice (in colder climates) can dam against them. GAF recommends centering a minimum-width underlayment on the valley before any metal or shingle work begins, precisely because the deck itself needs protection before the outer layers go on.
The three main valley types and how flashing works with each
There are three primary installation methods for roof valleys: open, closed-cut, and woven. Each one handles flashing differently. Knowing which type you have tells you a lot about your roof’s durability and what a repair will involve.
Open valleys
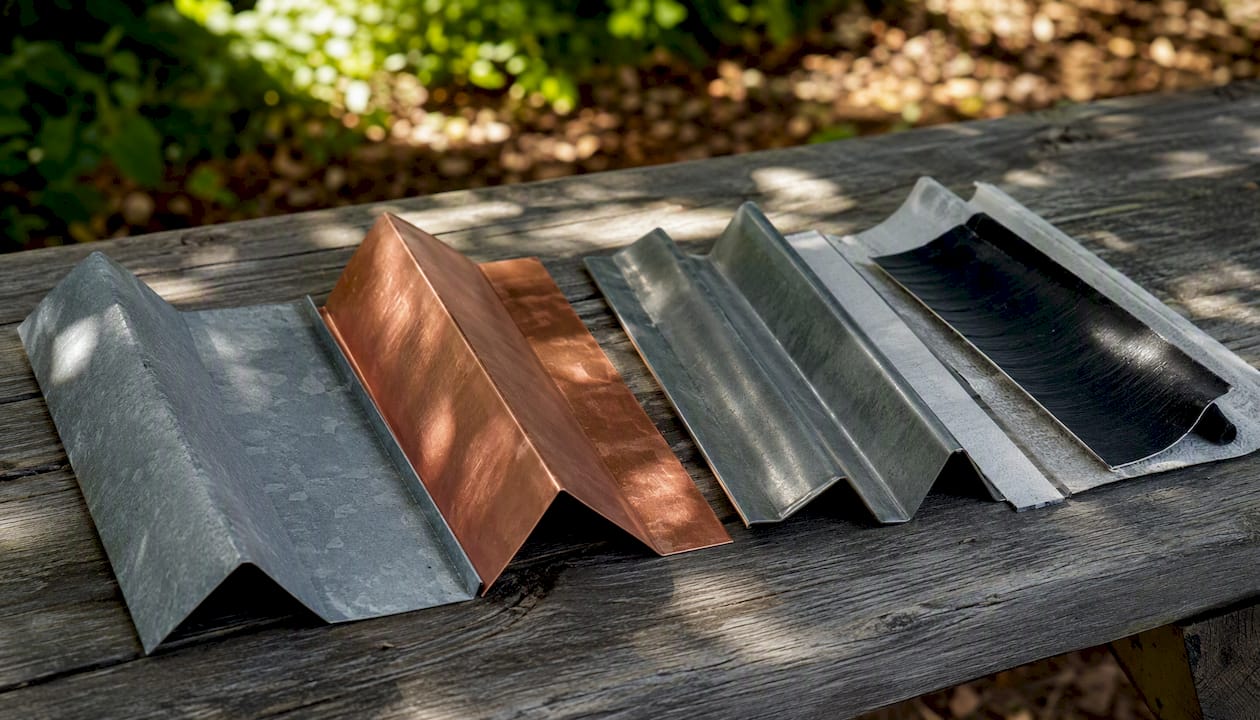
The metal liner is left exposed between two rows of shingles trimmed back from the centerline. You can see a strip of metal running the full length of the valley. Open metal valleys are often considered the most durable and easiest to inspect, and they shed debris, snow, and ice faster than shingle-in-valley methods. Common liner materials include copper, galvanized steel, and stainless steel.
The W-shaped profile (a center rib crimped into the metal) acts as a small mechanical barrier that slows cross-flow and helps prevent fast-moving water from the higher slope forcing itself beneath shingles on the lower slope, providing an advantage when the two intersecting planes have different pitches.
Closed-cut valleys
Shingles from one plane run continuously across the valley, and shingles from the other plane are cut back a few inches from the centerline and laid over the top. The metal or membrane liner underneath is hidden. Closed-cut valleys offer a cleaner visual line and are common in production roofing, though they require careful cutting and a solid underlayment beneath.
Woven valleys
Shingles from both planes are alternated across the centerline in an interlocking pattern. Woven valleys are weather-resistant but are incompatible with laminated architectural shingles, which are now the dominant product in most U.S. markets. That incompatibility has made woven valleys far less common. The Long Island (or California) variant is a modified woven approach where one plane’s shingles run continuously and the other plane’s shingles are woven over them, offering a middle ground between woven and closed-cut.
Pro Tip: From the ground, an open valley shows a visible metal strip. A closed-cut or woven valley looks like shingles run uninterrupted through the crease. If you can see metal, you have an open valley. If the shingles appear continuous, it’s closed-cut or woven.
| Method | Durability | Visibility | Best for | Skill required |
|---|---|---|---|---|
| Open metal | High | Exposed metal strip | All shingle types, tile, metal | Moderate |
| Closed-cut | Medium–High | Hidden, clean look | Architectural shingles | Moderate–High |
| Woven | Medium | Hidden | 3-tab shingles only | High |
What materials are used for valley flashing?
Valley assemblies combine two layers: a waterproof underlayment bonded to the deck and a metal or membrane liner on top. Each material choice carries different durability, cost, and climate implications.
Self-adhering underlayments
Self-adhering waterproof underlayments like Grace Ice & Water Shield, GAF WeatherWatch, and Tamko MoistureWrap make valley preparation more reliable than older felt-and-cement methods because they seal around nail penetrations rather than just covering them. All three products are peel-and-stick membranes that bond directly to the deck and create a continuous waterproof layer before any metal or shingles go on.
Metal liners
- Galvanized steel: The most common and affordable option. The Gibraltar 18 in. x 10 ft. galvanized steel W-valley flashing is a widely available retail example of the W-profile used in open valleys. Lifespan is moderate; in coastal or high-humidity climates, the zinc coating can degrade faster.
- Aluminum: Lighter and easier to cut, but less durable than steel unless it is a heavier gauge or color-coated. Not the first choice for coastal Florida homes where salt air accelerates corrosion.
- Stainless steel: Significantly more corrosion-resistant than galvanized or aluminum. A strong choice for coastal climates, though the cost is higher.
- Copper: The longest-lasting option and visually distinctive. Copper develops a patina over time and can last 50 years or more, but the material cost is substantially higher than steel.
For Tampa Bay homeowners, the choice of flashing material matters more than in inland climates because salt air and humidity accelerate corrosion on lower-grade metals.
| Material | Durability/lifespan | Aesthetics | Best roof types | Cost | Installation ease |
|---|---|---|---|---|---|
| Galvanized steel | Medium | Exposed silver metal | Shingles, tile | Low | Easy |
| Aluminum | Low–Medium | Exposed silver/color | Shingles | Low | Easy |
| Stainless steel | High | Exposed silver | Shingles, tile, metal | Medium–High | Moderate |
| Copper | Very high | Exposed, patinas to brown | All types | High | Moderate |
| Peel-and-stick membrane | High (under liner) | Hidden | All types | Low–Medium | Easy |
Pro Tip: In a coastal climate, ask your contractor specifically what gauge galvanized steel they use and whether they apply a sealant at the edges. Thin-gauge galvanized in a salt-air environment can show rust within a few years.
How valley flashing is installed: a homeowner-level overview
Understanding the installation sequence helps you evaluate a contractor’s work and ask the right questions before signing anything.
- Deck preparation. The old shingles and any deteriorated underlayment are removed. The deck is inspected for rot or soft spots and repaired before anything new goes on.
- Underlayment installation. A self-adhering membrane (Ice & Water Shield, WeatherWatch, or MoistureWrap) is centered on the valley centerline and pressed firmly to the deck. It should run the full length of the valley with no gaps.
- Metal liner placement. The metal flashing is laid over the underlayment, centered on the valley. Laps between metal sections must be a minimum of 4 inches, with the upper piece overlapping the lower so water sheds over the seam rather than into it.
- Fastening at edges only. Nails or screws go at the outer edges of the flashing only. Fasteners in the active flow zone are prohibited under IRC 2024 R905.2.8, which requires minimum 24-inch-wide metal valley flashing and sets specific lap and fastening rules.
- Shingle trimming and setback. For open valleys, shingles are trimmed back from the centerline (typically 3–6 inches per side, widening slightly toward the eave). For closed-cut, one plane’s shingles run past the centerline and the other plane’s shingles are cut back and sealed.
- Edge sealing. Exposed shingle edges along the valley are sealed with roofing cement to prevent wind-driven water from working underneath.
From the ground, quality work looks like straight, consistent metal lines with no visible gaps, no lifted shingle edges at the valley, and no exposed nail heads in the flow path. Ask your contractor for photos of the underlayment layer before the metal goes on.
Pro Tip: Request photos of the underlayment installation before the metal liner is laid. Once the metal is down, you can’t verify what’s underneath. A contractor confident in their work will have no problem sharing those photos.
A safety note: steep roofs require fall protection equipment and experience. Homeowners should not attempt major valley rework on any roof where footing is uncertain.
Does your roof need valley flashing, and what does code require?
Short answer: if two roof slopes meet anywhere on your home, that junction needs a continuous waterproof liner. There is no code-compliant scenario where a valley is left unprotected.
In cold climates, code provisions extend ice-and-water shield requirements specifically to valleys, because ice dams form there first and force meltwater back under shingles. In mild climates like Tampa Bay, an equivalent valley liner is still required as a minimum, and the high-rainfall environment makes self-adhering underlayment the practical standard rather than an upgrade.
Local amendments can be stricter than the IRC baseline. Florida’s Building Code, for example, has wind-resistance and water-intrusion requirements shaped by hurricane exposure that go beyond the national minimum. Always verify with your local building department or ask your contractor to confirm which code edition applies to your permit.
Pro Tip: If your home is in a flood zone or high-wind zone, check whether your insurance carrier has specific requirements for valley flashing materials or underlayment. Some carriers require documentation of the underlayment brand and installation method to honor a storm-damage claim.
How to spot valley flashing problems before they become leaks
Valleys are where most roof leaks start. Catching a problem early usually means a repair rather than a full replacement.
From the ground or a second-floor window, look for:
- Rust streaks running down from the valley line onto the shingles or fascia below
- Visible gaps or separation in the metal liner
- Shingles that are curled, cracked, or missing along the valley edges
- Dark staining or granule loss concentrated near the valley centerline
- Exposed nail heads anywhere in the valley flow path
From the attic (safely, without walking on insulation):
- Water stains or dark streaks on the sheathing directly below a valley
- Daylight visible through the deck (a serious sign)
- Soft or spongy sheathing when pressed from below
Inspectors and homeowners should pay close attention to valleys during any post-storm walkthrough. Wind-driven rain hits valleys at an angle, and debris accumulation there traps moisture against the metal. A roofing ventilation check from the attic can also reveal whether moisture from a valley leak has been working its way into the structure.
Small problems vs. replacement triggers:
A small section of lifted sealant at a shingle edge can often be re-sealed with roofing cement as a temporary measure. Localized rust on a small section of flashing can sometimes be treated and patched. But widespread corrosion, multiple failed seams, or a pattern of interior staining below the valley means the flashing assembly needs full replacement, not another patch.
Pro Tip: Take photos from the ground after every significant storm and keep them dated. If you eventually file an insurance claim, that photo record showing the condition before and after the storm is worth more than any verbal description.
Maintenance, repairs, and when to call for a replacement
Routine maintenance keeps valley flashing performing between professional inspections.
- Clear debris twice a year. Leaves, pine needles, and granules accumulate at the valley centerline and hold moisture against the metal. A soft brush or low-pressure rinse clears them without damaging the flashing.
- Check and re-seal edge gaps. Run a visual check along the shingle edges at the valley after heavy rain seasons. Small gaps where the sealant has dried out can be re-sealed with roofing cement.
- Keep gutters clear. A blocked gutter backs water up into the valley discharge point. Clean gutters are part of valley maintenance, not separate from it.
- Document condition annually. A dated photo from the ground each year gives you a baseline to compare against after storms.
For temporary repairs after storm damage, an adhesive membrane patch (cut from a self-adhering underlayment product) placed over a small puncture or crack can buy time until a contractor arrives. A tarp secured over the valley is a reasonable emergency measure for a large breach. Neither is a permanent fix.
When to replace rather than repair: widespread rust that has penetrated through the metal, multiple seam failures along the same valley, or any situation where you have patched the same spot more than once. If you are already reroofing, replacing the valley flashing at the same time is always the right call, since the labor cost of accessing it later far exceeds the material cost of new flashing now.
Pro Tip: Never install new shingles over old valley flashing without inspecting the metal first. An overlay that hides corroded or improperly lapped flashing will leak, and the new shingles won’t be the cause.
What a professional roofer checks and what it costs
A qualified contractor does more than look at the visible metal. Here is what a thorough valley inspection covers:
- Underlayment adhesion: Is the self-adhering membrane still bonded to the deck, or has it lifted at the edges?
- Seam laps: Are metal laps a minimum of 4 inches with the upper piece over the lower?
- Metal gauge: Is the flashing thick enough for the climate and roof type, or was the cheapest available material used?
- No-nail flow zone: Are there any fasteners in the active water path?
- Flashing fasteners at edges only: Nails at the center of the flashing are a code violation and a leak waiting to happen.
Cost drivers vary by access difficulty, valley length and complexity, material choice (copper costs significantly more than galvanized steel), and whether a full tear-off is required. A simple valley repair on an accessible single-story roof is a very different scope from replacing all valleys on a complex multi-gable roof during a full reroof.
Questions to ask your contractor before signing:
- What underlayment brand and product will you use?
- What gauge metal, and what profile (W vs. V)?
- Will you provide photos of the underlayment layer before the metal goes on?
- What warranty covers the flashing labor and materials?
Coastal Roofing & Construction is GAF-certified and manufacturer-trained, serving homeowners across Tampa Bay, Pinellas County, Hillsborough County, and Pasco County. For residential metal roof installation or a full shingle reroof with properly detailed valley assemblies, the team brings the same standard of workmanship to every valley on every project.
Ready to have your valley flashing inspected?

If you have noticed rust streaks, lifted shingles at a valley line, or interior staining after a storm, the time to act is before the next rain event. Coastal Roofing & Construction provides thorough roof inspections and valley flashing assessments for homeowners throughout the Tampa Bay area. Whether you need a targeted repair or are planning a full shingle roof replacement, the team will show you exactly what is happening at your valleys and what it will take to fix it right.
Contact Coastal Roofing & Construction for a professional inspection and honest estimate.
The part of valley flashing most homeowners get wrong
Most of the advice you will find on valley flashing focuses on the visible layer: which metal profile, which valley style, open versus closed. That is the wrong place to put your attention first.
The underlayment is where the real protection lives. A W-profile galvanized liner sitting directly on bare felt is a fundamentally weaker assembly than a V-profile liner sitting on a properly adhered self-adhering membrane, even though the metal on the first one looks more substantial. The membrane seals around every nail penetration. Felt does not. When wind-driven rain forces water sideways under shingles at 60 mph, the membrane is what stands between your deck and a leak. The metal is the first line of defense; the membrane is the last.
The second thing most homeowners underestimate is the no-nail zone. Nails driven through the center of valley flashing are one of the most common installation errors, and they are invisible once the shingles go on. Every nail hole in the flow path is a potential entry point. The IRC prohibition on exposed nails in the valley flow zone exists for exactly this reason, and it is one of the first things a knowledgeable inspector checks.
For Tampa Bay homeowners specifically, the coastal climate adds a third variable: material selection. Galvanized steel is the standard, but in a salt-air environment it is the minimum, not the ideal. Stainless steel or copper costs more upfront and lasts significantly longer without the corrosion risk that can compromise a galvanized valley within a decade of installation near the water.
The practical takeaway: when you get a roofing estimate, ask two specific questions before anything else. What underlayment product goes in the valley, and what gauge and profile is the metal? If a contractor cannot answer both questions without hesitation, that tells you something important about how they think about the work.
Sources
The following resources informed this guide and are worth bookmarking if you want to go deeper on any specific topic.
- Open valley roof vs. closed valley roof – Which is recommended – IKO
- Four ways to shingle a valley – Fine Homebuilding
- What Is a Roof Valley? Understanding Its Importance and Functionality – GAF
- 18 in. x 10 ft. Galvanized Steel W-Valley Flashing – Home Depot
- What is Valley Flashing? (Roofing Glossary) | JDH Remodeling
- Common flashing details – Building Science Corporation
Pro Tip: Save the manufacturer’s installation instructions for whatever underlayment your contractor uses (WeatherWatch, Ice & Water Shield, or MoistureWrap). If a warranty claim ever comes up, having that document on hand proves the product was specified correctly.