
Roof flashing is the thin metal or membrane material installed at roof intersections, edges, and penetrations to redirect water away from vulnerable seams. The most common types are step, counter, base, drip edge, valley, chimney, skylight, kickout, vent/pipe, and headwall/apron flashing, and each one exists because water finds the weakest joint on your roof and tries to get through it.
TL;DR:
- Proper flashing must lap over shingles by at least four inches vertically and horizontally to ensure water flows down and out without seeping sideways.
- Missing or incorrectly installed kickout flashing often leads to hidden water damage behind siding, even if the roof appears fine.
- Metal gauge, fastener choice, and material type must match the exposure conditions to prevent early corrosion, especially in coastal or salty environments.
- A comprehensive roof inspection after storms or in biannual checks can catch corrosion, uplift, or misalignment before leaks develop inside the home.
- Flashed components like chimneys, skylights, and valleys require manufacturer-matched materials for proper sealing and durability.
Table of Contents
- What Roof Flashing Types Actually Do for Your Roof
- Common Roof Flashing Types and Where Each One Goes
- Roof Flashing Materials and What Actually Holds Up
- Installation Rules That Separate a Good Job From a Callback
- How Often to Check Your Flashing and What to Look For
- How a Roofing Contractor Actually Evaluates Flashing
- Get a Flashing Inspection Before Small Leaks Become Big Repairs
- Sources
- FAQ
What Roof Flashing Types Actually Do for Your Roof
Flashing works alongside your roof’s drainage plane, that layered system of underlayment and housewrap designed to shed water downward before it ever reaches your sheathing. Every seam, chimney, dormer, and pipe penetration breaks that plane, and flashing is the patch that keeps the break from becoming a leak. When its absent or installed backward, water doesn’t just run off the roof. It works sideways and downward into the wall cavity, often for years before anyone notices a stain.
The damage from bad flashing rarely shows up where the leak starts. Homeowners find soft drywall near a chimney and assume the roof around it failed, when the real culprit is a missing cricket two feet upslope. Building America research on water management is blunt about the mechanism: flashing has to be sloped toward drainage and lapped shingle fashion, or it traps water instead of shedding it.
A few things separate flashing that works from flashing that quietly fails:
- Each course laps over the one below it so water always moves down and out, never sideways into a seam.
- Flashing ties into the wall’s drainage plane rather than sitting on top of the siding or stopping short of it.
- Metal gauge and fastener choice match the exposure. Coastal wind and salt air chew through undersized material fast.
- Step flashing extends at least 4 inches up the wall and 4 inches along the roof deck, per longstanding building code guidance.
Common Roof Flashing Types and Where Each One Goes
Every flashing type solves a specific water problem at a specific location on your roof. Knowing which piece belongs where is the fastest way to spot trouble during your own walk-around inspection.
1. Step Flashing
Step flashing is a series of small, L-shaped metal pieces installed one course at a time along a roof-to-wall intersection, like where a dormer meets the main roof slope. Each piece overlaps the shingle below and tucks under the shingle above, creating a shingle-fashion stack that sheds water downhill. The most common failure is a roofer using one long strip of “step flashing” instead of individual pieces. A single strip can’t flex with the roof plane and tends to crack loose within a few seasons.
2. Kickout Flashing
Kickout flashing is the small diverter piece placed at the bottom of a step-flashing run, where a sloped roof meets a wall and dumps water toward the siding instead of into a gutter. Without it, water sheets directly down the wall and behind the siding, soaking the sheathing from the inside out. InterNACHI’s inspection guidance calls kickouts one of the most frequently missed components on residential roofs, largely because they’re easy to skip and invisible once siding goes back up. If you see a dark streak or stain on siding just below a roof-wall junction, that’s often a missing kickout announcing itself years later.
3. Counter Flashing and Base Flashing
This is a two-piece system used against masonry, chimneys, and parapet walls. Base (or continuous) flashing attaches to the roof deck and turns up against the vertical surface. Counter flashing is embedded into a mortar joint or reglet above it and folds down over the base flashing, so water can never get behind the seam even as the roof and wall move independently over time.
4. Drip Edge
Drip edge is the strip of metal that runs along the eaves and rakes, directing water off the roof deck and into the gutter instead of letting it curl back under the shingles or run down the fascia. It’s inexpensive, easy to overlook, and one of the first things a real inspection checks.
5. Valley Flashing
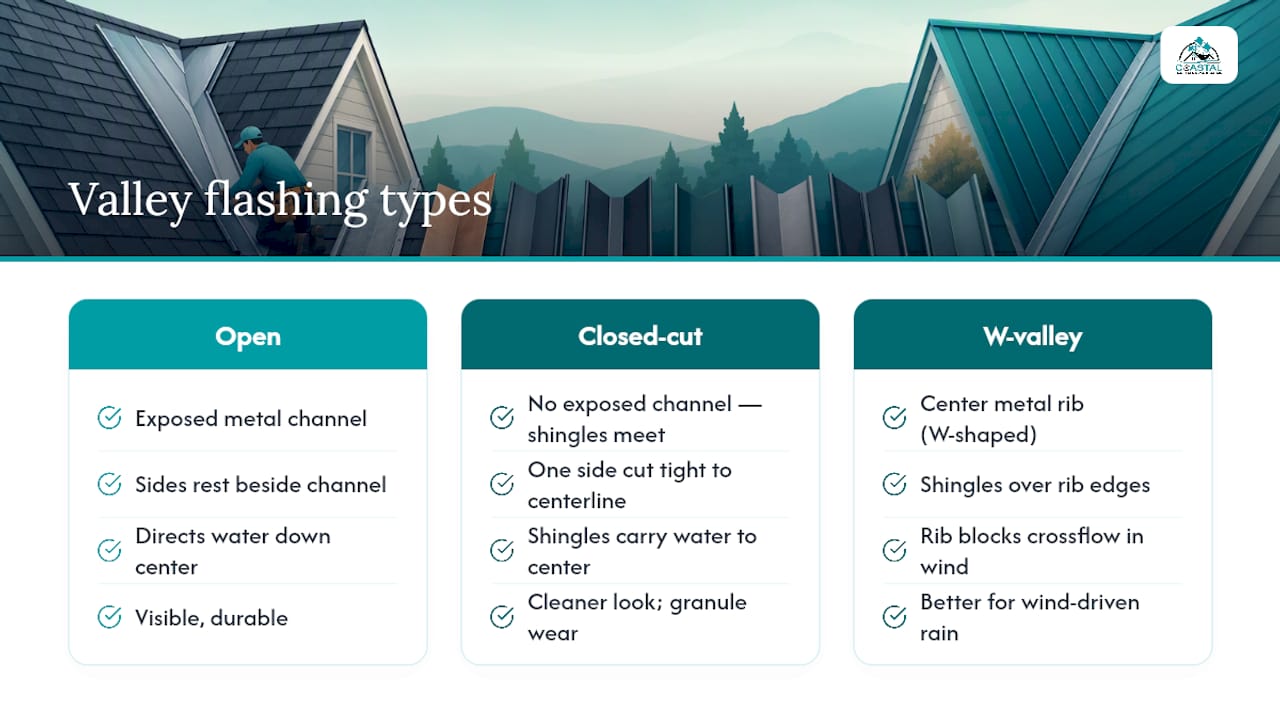
Valleys carry more water volume than any other part of the roof, which is why the flashing method matters. Open valleys expose a metal channel down the center. Closed-cut valleys run shingles across with one side trimmed tight to the centerline. W-valleys use a center rib to keep water from crossing from one slope to the other during heavy wind-driven rain. Open vs. closed valleys aren’t just an aesthetic choice; closed valleys look cleaner but are more prone to granule wear at the cut line over time.
6. Chimney Flashing
Chimney flashing is really four systems working together: apron flashing at the front, step flashing along the sides, counter flashing embedded in the masonry, and a saddle or cricket behind the chimney on the upslope side. Chimneys wider than roughly 30 inches typically need a cricket to split water flow around the structure instead of letting it pool against the back wall. Any one of these four pieces failing tends to get blamed on “the roof” when it’s really one bad seam.
7. Skylight Flashing
Skylight leaks are almost always a flashing problem, not a glass problem. Skylight manufacturers ship model-specific flashing kits engineered for their exact curb dimensions, and industry guidance is consistent that improvised, field-cut flashing around a skylight is a leading cause of leaks. If a skylight is leaking, the fix is almost never a bead of sealant. It’s a matched kit installed correctly.
8. Vent Pipe and Boot Flashing
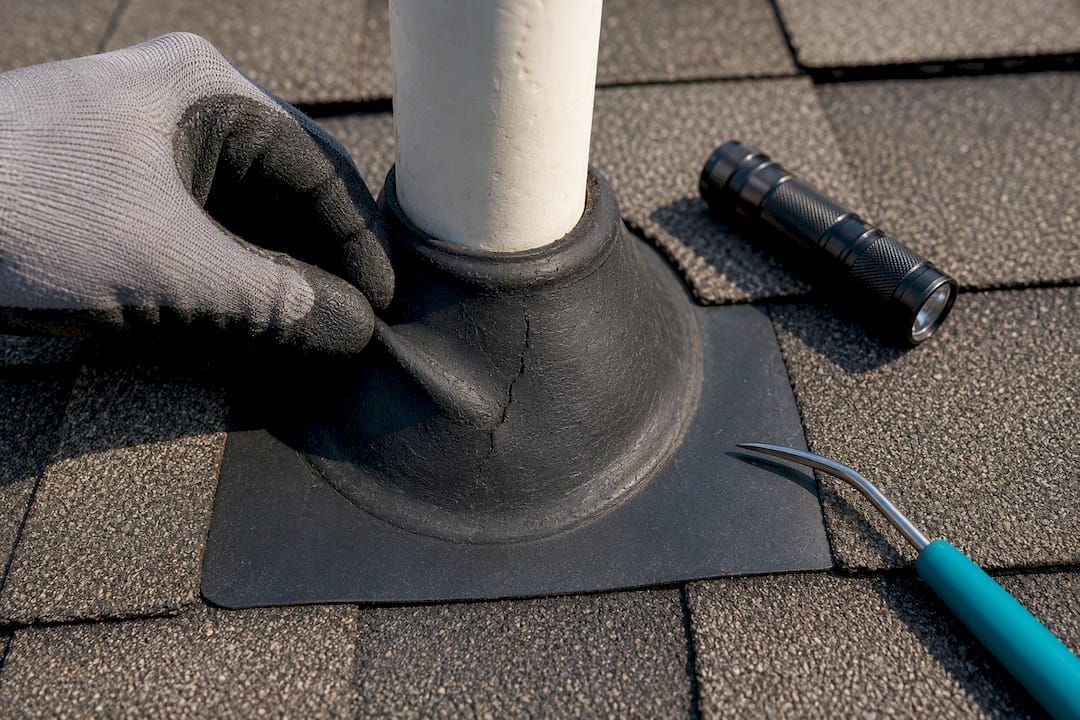
Plumbing vents and exhaust stacks use a flashing “boot,” typically a metal base with a rubber or EPDM collar that seals around the pipe. EPDM is flexible and cheap, but it’s also UV-vulnerable, and boots often wear out before the surrounding shingles do. Cracked, brittle collar rubber around a vent pipe is one of the easiest defects to spot from a ladder.
9. Headwall, Apron, and Ridge Flashing
Headwall (or apron) flashing covers the joint where a roof slope runs directly into a vertical wall at the top, rather than alongside it, common at dormers and additions. Ridge flashing and specialty pan or gravel-stop details show up on flat and low-slope systems where drainage relies on edge metal rather than gravity down a slope. These pieces get less attention because they’re less common, but they fail the same way everything else does: when the lap runs the wrong direction.
Pro Tip: Walk your roofline after a hard rain and look at the ground, not the shingles. Streaking, staining, or standing water at the base of a wall almost always points back to a specific flashing joint upslope, even when the roof itself looks fine from a distance.
Roof Flashing Materials and What Actually Holds Up
Material choice determines how long flashing lasts before it starts leaking again, and the right answer changes depending on your climate and roof type.
- Galvanized steel is the budget standard for shingle roofs. It’s affordable and widely available but corrodes faster in salt air.
- Aluminum is lightweight and resists rust well, though it can pit and discolor in coastal exposure.
- Copper costs more up front but develops a protective patina and often outlasts the roof it’s installed on.
- Stainless steel handles humid, salty environments better than galvanized steel and is a common upgrade near open water.
- Rubberized membranes and flashing tape flex around irregular details like pipe boots and low-slope transitions where rigid metal can’t conform.
Coastal environments accelerate corrosion on standard flashing metals, and IBHS guidance on roof flashing points homeowners in salt-exposed areas toward stainless, copper, or properly coated metal rather than bare galvanized steel.
Mixing metals creates its own problem. Galvanic corrosion happens when two dissimilar metals contact each other in the presence of moisture, and one metal essentially sacrifices itself to protect the other, corroding rapidly in the process. Copper touching aluminum is a classic mistake. So is an untreated metal sitting directly against pressure-treated lumber, which contains chemicals that speed corrosion. Professionals separate dissimilar metals with isolation membranes, bituminous coatings, or compatible fasteners rather than letting them touch directly.
Standing seam metal roofs, tile roofs, and skylights usually call for manufacturer-matched or custom-fabricated flashing rather than generic stock pieces, since the profiles have to match the panel or tile geometry exactly to seal properly.
Installation Rules That Separate a Good Job From a Callback
Get the direction of water flow wrong at any single seam and you’ve built a leak into the roof, no matter how good the materials are.
- Shingle-fashion overlap comes first. Every course of flashing has to lap over the piece below it so water moves down and out. A reversed slope, even by a few degrees, traps water at the seam instead of shedding it, per Building America’s water-management guidance.
- Step and kickout have to work as one system. Step flashing needs that minimum 4 inch up-the-wall and 4 inch along-the-deck extension, and it needs a properly sized kickout at the bottom to divert water into the gutter instead of behind the siding.
- Watch for sealed bottom edges. Some installers caulk the bottom of a flashing run solid, thinking they’re sealing it. That traps water that’s supposed to drain out, which rots the deck from underneath.
- Fasteners and materials should match. Incompatible metals or the wrong fastener type invite galvanic corrosion long before the shingles themselves wear out.
Pro Tip: If a contractor’s proposal doesn’t specifically mention kickout flashing at every roof-to-wall junction, ask why. It’s one of the cheapest components on the job and one of the most commonly skipped.
How Often to Check Your Flashing and What to Look For
Twice-a-year inspections, plus one after any major storm, catch most flashing problems before they become drywall problems.
- Look for rust streaks, pinholes, or lifted seams on visible metal flashing at chimneys, valleys, and dormers.
- Check vent pipe boots for cracked, brittle, or shrunken rubber collars.
- Scan roof-to-wall junctions for missing or undersized kickouts, especially where siding meets a lower roof slope.
- After high wind or hail, check for lifted or bent flashing edges, not just missing shingles.
- Small fixes like re-caulking a pipe boot collar or replacing a single corroded fastener are reasonable DIY tasks.
- Anything involving removing shingles, re-flashing a chimney, or diagnosing a hidden leak belongs to a licensed contractor, since the damage is often more extensive than the visible symptom.
A professional inspection tends to catch flashing issues homeowners miss simply because inspectors know which specific junctions fail first.
How a Roofing Contractor Actually Evaluates Flashing
A licensed, insured, and factory-trained contractor with manufacturer certifications shapes how a flashing inspection actually runs. It’s not a glance from the ground. Technicians check every roof-to-wall junction for correct step and kickout integration, verify chimney and skylight flashing against manufacturer specs, and look for galvanic corrosion where metals meet. The decision between a targeted repair and a broader replacement usually comes down to how far water has already traveled behind the visible flashing, not just what’s cracked on the surface.
— Ryan
Get a Flashing Inspection Before Small Leaks Become Big Repairs
Most flashing failures don’t announce themselves until the damage is already inside a wall or ceiling, which is exactly why a trained eye on the roof matters more than a quick look from the driveway. Coastal Roofing & Construction’s technicians are manufacturer-certified through Owens Corning, GAF, and Tri County Metals, so whether the fix involves step flashing on a shingle roof, a custom-matched profile on a standing seam metal system, or a full tile roofing reflash, the work follows the manufacturer’s own specifications rather than a generic patch.

If you’ve spotted rust streaks, a missing kickout, or a stain near a chimney or dormer, schedule a roof inspection with Coastal Roofing & Construction, or explore roof replacement options if the flashing damage points to a larger issue underneath.
Sources
- IBHS guidance: RICOWI roof guide — metal flashing
- Step and kick-out flashing at roof-wall intersections | Building America Solution Center
- All about roof flashing — GreenBuildingAdvisor
- Building America: Water management for residential construction (flashings and special details)
- InterNACHI: Kick-out flashing guidance
FAQ
What Is the Most Common Type of Roof Flashing?
Step flashing is the most common type on residential roofs, used anywhere a sloped roof meets a vertical wall, such as at dormers and additions. It works in individual pieces that overlap each shingle course rather than as one continuous strip.
What Is Kickout Flashing and Why Does It Matter?
Kickout flashing is a diverter piece placed at the bottom of a step-flashing run that redirects water away from the wall and into the gutter. InterNACHI notes it’s one of the most frequently missed components, and its absence causes hidden water damage behind siding that can go unnoticed for years.
What’s the Difference Between Step Flashing and Counter Flashing?
Step flashing is a series of small overlapping pieces installed with shingle courses along a roof-to-wall junction. Counter flashing is a separate piece embedded into masonry or a wall surface that folds down over base flashing, used at chimneys and parapets where the wall and roof move independently.
Should I Choose an Open or Closed Valley?
Open valleys expose a metal channel that handles high water volume with minimal shingle interference, while closed-cut valleys run shingles across for a cleaner look but can wear faster at the cut line. The right choice depends on roof slope, climate, and material, which a roof inspection can help determine for your specific roof.
How Much Does Roof Flashing Repair Cost?
Flashing repair costs vary based on the type, material, and extent of hidden damage, so Coastal Roofing & Construction provides pricing after an on-site inspection rather than a flat rate. Current service details are available on the roof repair page.
Can I Install or Repair Roof Flashing Myself?
Minor tasks like recaulking a pipe boot collar are manageable for most homeowners, but flashing tied to structural water management, like step, kickout, or chimney flashing, requires removing shingles and understanding drainage planes. Building America’s own installation guidance treats this as a code-level detail best left to a licensed contractor.